Selasa, 03 Oktober 2017

Cara Update Lisensi WHM/Cpanel Di Dalam Server

Bagi pengguna lisensi WHM/Cpanel sangatlah penting untuk meng-update lisensi WHM/Cpanel ini, entah itu /bulan atau /tahunnya, untuk melihat aktif atau tidak lisensi yang anda miliki bisa di cek di http://verify.cpanel.net/, berikut di bawah ini Cara Update Lisensi WHM/Cpanel Di Dalam Server yang adan miliki.

1. Login ke server anda melaluli putty.
2. Jalankan perintah /usr/local/cpanel/cpkeyclt di dalam server anda, tunggu sampai proses selesai.
3. Untuk memastikan lisensi anda sudah terupdate silahkan mengunjungi http://verify.cpanel.net/ dengan memasukan IP address anda.

Semoga 3 langkah di atas bisa membantu anda untuk meng-update lisensi WHM/Cpanel yang anda miliki, karena saya mengerti bagi pengguna lisensi WHM/Cpanel ini sangatlah penting untuk meng-update setiap bulannya.

Jumat, 10 Februari 2017

Mengenal Squirrelmail, webmail terbaik

Squirrelmail adalah salah satu aplikasi web yang sudah terpasang di CPanel untuk keperluan membaca email. Adalah aplikasi webmail yang mendukung protokol IMAP dan SMTP dan menampilkan halaman dalam format HTML tanpa membutuhkan javascript, sehingga bisa dengan mudah diakses menggunakan browser apapun dan sangat ringan.

Dengan tampilannya yang sederhana, SquirrelMail mempunyai semua fungsi-fungsi yang seharusnya ada di aplikasi pembaca email, meliputi penggunaan attachment, buku alamat, folder, kalender, dll.

Jadi jika Anda sedang butuh untuk membuka webmail dan koneksi internet tidak terlalu bagus, Anda bisa memilih Squirrelmail sebagai aplikasi pembaca email Anda.

Bila masih mengalami kesulitan mengoperasikan Squirrelmail, Anda bisa langsung mengunjungi halaman panduan penggunaan Squirrelmail.

Rabu, 06 November 2013

Install PhpMyadmin Di OS Linux Centos

Bagi yang belum tau mungkin anda seraching di google dengan kata kunci Install PhpMyadmin Di OS Linux Centos, Bagaimana Install PhpMyadmin Di OS Linux Centos, Cara Install PhpMyadmin Di OS Linux Centos bahkan dengan bahasa inggris How To Install PhpMyadmin On Linux Centos, Ok, kali ini saya akan memposting Install PhpMyadmin Di OS Linux Centos, berikut di bawah ini caranya,

  • Login sebagai root ke Server/vps anda.
  • Ketikan perintah cd /var/www/html untuk berpindahk ke folder.
  • Download PhpMyAdmin dengan cara wget http://sourceforge.net/projects/phpmyadmin/files/phpMyAdmin/4.0.9/phpMyAdmin-4.0.9-all-languages.tar.gz.
  • Extract PhpMyAdmin dengan cara tar -zxvf phpMyAdmin-4.0.9-all-languages.tar.gz.
  • Setelah di extract rename phpMyAdmin-4.0.9-all-languages menjadi phpmyadmin supaya lebih simple, caranya mv phpMyAdmin-4.0.9-all-languages phpmyadmin.
  • Masuk ke direktori phpmyadmin dan copy file yang bernama config.sample.inc.php cd /var/www/html/phpmyadmin.
  • Copy file dengan cara cp config.sample.inc.php config.inc.php.
  • Edit file dengan cara nano config.inc.php.
  • Edit tulisan berikut pada file config.inc.php
 /* Authentication type */
$cfg['Servers'][$i]['auth_type'] = 'cookie';

Menjadi
/* Authentication type */
$cfg['Servers'][$i]['auth_type'] = 'http';

Save dan exit
  • Restart httpd/apache dengan cara service httpd restart.
  • ketikan IPANDA/phpmyadmin di browser yang anda gunakan.
  • Error PHP 5.2+ is required, kenapa ?? Upgrade versi php anda supaya error tersebut tidak lagi muncul :)
Semoga membantu Install PhpMyadmin Di OS Linux Centos, jika ada kata kata yang salah mohon untuk di maafkan. Sumber: http://yaser-mydocument.blogspot.com/2012/01/cara-install-phpmyadmin-di-linux-centos.html

Install PHP Di Server/VPS Linux

Untuk menginstall PHP Di Server/VPS Linux ikuti langkah di bawah ini,

  • Masuk ke Server/vps anda sebagai root.
  • Ketikan perintah yum install php php-mysql.
  • Cari modul PHP dengan perintah yum search php- dan hasilnya,
[root@yourlinksubmmit ~]# yum search php-
Loaded plugins: fastestmirror
Loading mirror speeds from cached hostfile
 * base: mirror.ash.fastserv.com
 * extras: mirror.trouble-free.net
 * updates: mirror.atlanticmetro.net
================================ Matched: php- =================================
php-pear.noarch : PHP Extension and Application Repository framework
php-bcmath.x86_64 : A module for PHP applications for using the bcmath library
php-cli.x86_64 : Command-line interface for PHP
php-common.x86_64 : Common files for PHP
php-dba.x86_64 : A database abstraction layer module for PHP applications
php-dbase.x86_64 : Standard dBase module for PHP applications
php-devel.x86_64 : Files needed for building PHP extensions.
php-gd.x86_64 : A module for PHP applications for using the gd graphics library
php-imap.x86_64 : A module for PHP applications that use IMAP.
php-ldap.x86_64 : A module for PHP applications that use LDAP.
php-mbstring.x86_64 : A module for PHP applications which need multi-byte string
                    : handling
php-mcrypt.x86_64 : Standard PHP module provides mcrypt library support
php-mhash.x86_64 : Standard PHP module provides mhash support
php-mssql.x86_64 : Standard PHP module provides mssql support
php-mysql.x86_64 : A module for PHP applications that use MySQL databases.
php-ncurses.x86_64 : A module for PHP applications for using ncurses interfaces
php-odbc.x86_64 : A module for PHP applications that use ODBC databases.
php-pdo.x86_64 : A database access abstraction module for PHP applications
php-pear-Auth-SASL.noarch : PEAR: Abstraction of various SASL mechanism
                          : responses
php-pear-DB.noarch : PEAR: Database Abstraction Layer
php-pear-Date.noarch : Date and Time Zone Classes
php-pear-File.noarch : Common file and directory routines
php-pear-HTTP-Request.noarch : Provides an easy way to perform HTTP requests
php-pear-Log.noarch : Abstracted logging facility for PHP
php-pear-MDB2.noarch : Database Abstraction Layer
php-pear-MDB2-Driver-mysql.noarch : MySQL MDB2 driver
php-pear-Mail.noarch : Class that provides multiple interfaces for sending
                     : emails
php-pear-Mail-Mime.noarch : Classes to create and decode mime messages
php-pear-Net-SMTP.noarch : Provides an implementation of the SMTP protocol
php-pear-Net-Sieve.noarch : Communication with timsieved
php-pear-Net-Socket.noarch : Network Socket Interface
php-pear-Net-URL.noarch : Easy parsing of URLs
php-pecl-Fileinfo.x86_64 : Fileinfo is a PHP extension that wraps the libmagic
                         : library
php-pecl-memcache.x86_64 : Extension to work with the Memcached caching daemon
php-pgsql.x86_64 : A PostgreSQL database module for PHP.
php-readline.x86_64 : Standard PHP module provides readline library support
php-snmp.x86_64 : A module for PHP applications that query SNMP-managed devices.
php-soap.x86_64 : A module for PHP applications that use the SOAP protocol
php-tidy.x86_64 : Standard PHP module provides tidy library support
php-xml.x86_64 : A module for PHP applications which use XML
php-xmlrpc.x86_64 : A module for PHP applications which use the XML-RPC protocol
php53-bcmath.x86_64 : A module for PHP applications for using the bcmath library
php53-cli.x86_64 : Command-line interface for PHP
php53-common.x86_64 : Common files for PHP
php53-dba.x86_64 : A database abstraction layer module for PHP applications
php53-devel.x86_64 : Files needed for building PHP extensions
php53-gd.x86_64 : A module for PHP applications for using the gd graphics
                : library
php53-imap.x86_64 : A module for PHP applications that use IMAP
php53-intl.x86_64 : Internationalization extension for PHP applications
php53-ldap.x86_64 : A module for PHP applications that use LDAP
php53-mbstring.x86_64 : A module for PHP applications which need multi-byte
                      : string handling
php53-mysql.x86_64 : A module for PHP applications that use MySQL databases
php53-odbc.x86_64 : A module for PHP applications that use ODBC databases
php53-pgsql.x86_64 : A PostgreSQL database module for PHP
php53-process.x86_64 : Modules for PHP script using system process interfaces
php53-pspell.x86_64 : A module for PHP applications for using pspell interfaces
php53-snmp.x86_64 : A module for PHP applications that query SNMP-managed
                  : devices
php53-soap.x86_64 : A module for PHP applications that use the SOAP protocol
php53-xml.x86_64 : A module for PHP applications which use XML
php53-xmlrpc.x86_64 : A module for PHP applications which use the XML-RPC
                    : protocol
[root@yourlinksubmmit ~]#
  • Langkah selanjutnya buat file info.php dengan perintah nano /var/www/html/info.php
  • Dan isikan.
<?php
phpinfo();
?>
  • Restart Apache/httpd dengan perintah service httpd restart.
  • Langkah terakhir buka IPSERVER?VPS/info.php .
Kurang lebih tampilan PHP anda seperti di bawah ini,

Install MySQL Di Server/VPS Linux

Setelah berhasil memposting Install Web Server Apache Di Server/VPS Linux kali ini saya ingin memposting Bagaimana Cara Install MySQL Di Server/VPS Linux? Ikuti langkah di bawah ini untuk menginstallnya,
  • Login ke Server/vps anda sebagai root
  • Jalankan perintah yum install mysql mysql-server.
  • Start MySQL dengan perintah service mysqld start.
  • Masukkan ke dalam script startup agar menyala otomatis apabila reboot dilakukan dengan perintah chkconfig --levels 235 mysqld on dan periksa dengan perintah chkconfig --list.
Apakah proses sudah selesai sampai di sini?? Belum, proses Install MySQL Di Server/VPS Linux belum selesai sampai dengan di sini, selanjutnya ikuti langkah di bawah ini,

MySQL Secure Installation
Jalankan script mysql_secure_installation setelah anda melakukan instalasi MySQL, untuk menghilangkan Database Test, memberikan password root MySQL, menghapus remote access dan anonymous users.
Enter current password for root (enter for none):
OK, successfully used password, moving on...

Setting the root password ensures that nobody can log into the MySQL
root user without the proper authorisation.

Set root password? [Y/n] y
New password:
Re-enter new password:
Password updated successfully!
Reloading privilege tables..
 ... Success!


By default, a MySQL installation has an anonymous user, allowing anyone
to log into MySQL without having to have a user account created for
them.  This is intended only for testing, and to make the installation
go a bit smoother.  You should remove them before moving into a
production environment.

Remove anonymous users? [Y/n] y
 ... Success!

Normally, root should only be allowed to connect from 'localhost'.  This
ensures that someone cannot guess at the root password from the network.

Disallow root login remotely? [Y/n] y
 ... Success!

By default, MySQL comes with a database named 'test' that anyone can
access.  This is also intended only for testing, and should be removed
before moving into a production environment.

Remove test database and access to it? [Y/n] y
 - Dropping test database...
 ... Success!
 - Removing privileges on test database...
 ... Success!
 Password MySQL anda sudah anda buat ketika mengetikan password di bawah ini,
Set root password? [Y/n] y
New password:
Re-enter new password:
Password updated successfully!
Reloading privilege tables..
 ... Success!


Sekarang anda coba login ke MySQL dengan perintah mysql -u root -p.
[root@yourlinksubmmit ~]# mysql -u root -p
Enter password:
Welcome to the MySQL monitor.  Commands end with ; or \g.
Your MySQL connection id is 11
Server version: 5.0.95 Source distribution

Copyright (c) 2000, 2011, Oracle and/or its affiliates. All rights reserved.

Oracle is a registered trademark of Oracle Corporation and/or its
affiliates. Other names may be trademarks of their respective
owners.

Type 'help;' or '\h' for help. Type '\c' to clear the current input statement.

mysql>


Di atas contoh ketika anda berhasil login ke MySQL anda.

Nah, selesai lah Cara Install MySQL Di Server/VPS Linux, semoga membantu :)

Install Web Server Apache Di Server/VPS Linux

Akhirnya punya juga VPS  :) , Ok, kali ini saya akan membagi ilmu Bagaimana Cara Install Web Server Apache Di Server/VPS Linux ?? ikuti langkah di bawah ini;

  • login ke server/vps anda sebagai root.
  • ketikan perintah yum install httpd di dalam server/vps anda.
  • start apache dengan perintah service httpd start.
  • Masukkan ke dalam script startup agar menyala otomatis apabila reboot dilakukan dengan perintah chkconfig --levels 235 httpd on dan periksa dengan perintah chkconfig --list.
  • Dan yang terakhir buka IP server/vps anda di browser yang anda gunakan.
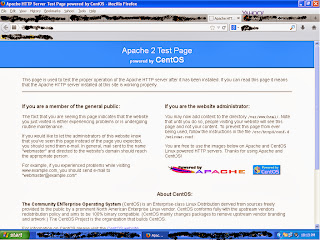
GREAATTTT!!!!!!!! webserver apache sudah terinstall :) dan kurang lebih penampakannya seperti di bawah ini.